Shifts And Grins Reverse Light Brackets And Diode Dynamics Lights

is there a harness to tap to the light instead of
Good thought, but it does not appear to work when using the trailer harness as the reverse trigger. Just ran a light show and the new lights weren’t coming on when the factory reverse lights were. Tazer doesn’t seem to send anything out to the trailer port.
View attachment 39981
Thanks for testing!! I guess the solution would only work to tap the rear lights plug. Oracle did that with their reverse light kit for the Gladiators (I had that and it was awesome).

Can someone share a picture of the connectors for the Diode Dynamics lights please? I have an extra harness for the Gladiator, I want to see if the plug is the same for the rear tail lights between Ram and Jeep. That would be a good and cheap solution for everyone.
 
is there a harness to tap to the light instead of

Thanks for testing!! I guess the solution would only work to tap the rear lights plug. Oracle did that with their reverse light kit for the Gladiators (I had that and it was awesome).

Can someone share a picture of the connectors for the Diode Dynamics lights please? I have an extra harness for the Gladiator, I want to see if the plug is the same for the rear tail lights between Ram and Jeep. That would be a good and cheap solution for everyone.
I’ll post a picture here shortly. If I can’t find a good one, I can snap a picture of the connectors when I get back to the shop. It’s a 4 pin style deutsch connector that uses 3 of the four pins.
C9050A0B-F93F-4F80-BE51-9E9BDF530936.webp
 
Tried to order but the payment won’t process - likely because of my Canadian shipping address. How can I proceed to order?

Thanks for the killer product! Glad to see the plug and play harness as an option On the product page. A++
 
Tried to order but the payment won’t process - likely because of my Canadian shipping address. How can I proceed to order?
Thanks for the killer product! Glad to see the plug and play harness as an option On the product page. A++
Shoot me a message or email and we can invoice it. Canadian shipping is always messed up so I invoice my Canadian shipments so I can get you an accurate shipping price.
 
So I just spent some time under the truck, studying how to get this installed. Got a couple of questions for anyone who has already done this.
How did you route the harness forward to the engine bay? Seems like it would be best to follow the current wire bundles on the right side of the truck. Did you start at the rear end, and pass the harness forward?
Once in the engine bay, where did you tap into power? At the battery, or at the fuse block (if so, which fuse)?
And for wiring to an auxiliary switch, how did you do it? The included harness has a multi-way switch (auto, off, and manual). Seems like you’d want to hard-wire the “auto” wires together, and just run the manual portion to an aux switch.
And just to make sure - these things can’t be powered solely by connecting to the trailer harness, right? They require direct power from the battery or fuse block?
Thanks for any answers. Just don’t want to get stuck mid-install when I finally tackle it.
@Eighty hopefully others will jump in as to how they installed it. I'll be doing a write up in the next week on two installs. One is a TRX I should be doing next weekend and the other is a Rebel I will likely do a week from tomorrow. The TRX will get wired in to the aux switch. I haven't decided which frame rail I am running the wires up yet but I am leaning towards the driver's side. I am tapping in to battery power at the battery. Since I am tapping into the aux switch, I will likely ditch the three way switch and relay. I will also most likely not tie up a switch to manually control the red backlight. I am going to reverse engineer a Diode Dynamics harness today to come up with a wiring diagram for it that should help answer people's questions on different set ups they are wishing to run. I am working on that wiring diagram because I am surprised but love all of the different ways people are coming up with to run these. Some of the questions I haven't had answers for just yet without a complete wiring diagram which is why I am reverse engineering the harness today to come up with that. If you only wanted automatic operation there is a way to run this off of the plug and play harness only. The two wires from the plug and play harness are your power wires and you have to add a ground. Looking forward to other peoples methods of installs.
 
Took this one last night. Really shows the difference. In the top down view, the reverse lights are now brighter than the headlights!
C7E0DFF6-9280-495D-A506-D37A9D3B798A.webp
 
Took this one last night. Really shows the difference. In the top down view, the reverse lights are now brighter than the headlights!View attachment 40942
That is so awesome!!! Great post and great depiction of the light output as well as the lights not washing out the camera view. Thank you for sharing!
 
That is so awesome!!! Great post and great depiction of the light output as well as the lights not washing out the camera view. Thank you for sharing!
Looking to place an order for this kit with the brackets and lights.. If I order the plug and play harness add on, do I still get the regular harness as well?
 
Looking to place an order for this kit with the brackets and lights.. If I order the plug and play harness add on, do I still get the regular harness as well?
It depends on if you want to control the reverse lights manually as well as automatic function. I’m creating a new kit that is a standalone plug and play kit that will be a super simple install and will work automatically but you will lose the ability to control them manually.
 
It depends on if you want to control the reverse lights manually as well as automatic function. I’m creating a new kit that is a standalone plug and play kit that will be a super simple install and will work automatically but you will lose the ability to control them manually.
I don't think I would need the option to turn the lights on without being in reverse. For this set, it will have the red lights come as with regular lights on correct?
 
Ok. You asked for it. Here it is. Auto operation only plug and play harness in a kit with the lights and brackets. These will be a super easy install. You will mount your brackets to the truck, mount the lights to the brackets, unplug the trailer light harness connector behind the bumper, plug in your new plug and play harness to both sides of that connector (The plug and play harness is a T harness that plugs inline with the existing harness), route your two harness leads to the pod lights and plug them in. You now have a fully functioning system. The only downside to this setup is you don't have manual control of the white lights in the new pods. The lights only work automatically with the trucks lights. The upside is a super easy and quick installation with cool red back lights, and bright white reverse lights.

Pro Kit:


Sport Kit:

 
Last edited:
I don't think I would need the option to turn the lights on without being in reverse. For this set, it will have the red lights come as with regular lights on correct?
You are correct.
 
Awesome! just ordered.
Got it! Thanks for the order. Got a few more already too. Obviously this was something that was wanted. Thank you to everyone that asked for this. When you guys speak, we listen. If we can make it happen, we do.
 
@Shifts_And_Grins Do you have the installation of this kit documented? I thought I watched a video somewhere but can't remember. Links to any documentation would be appreciated.
 
@Shifts_And_Grins Do you have the installation of this kit documented? I thought I watched a video somewhere but can't remember. Links to any documentation would be appreciated.
I received my kit last week and installed it on Sunday. As everything is plug and play, there isn’t much to document.
  1. Crawl under the rear of the truck and remove the harness that plugs into the trailer receptacle on the backside of the rear bumper. I accessed this pretty easily from the passenger side.
  2. Plug in the included Diode Dynamics harness where you just removed the Ram harness and the plug the original Ram harness into the pigtail connector hanging right there. (Once you see the harnesses, my lame description will make sense.)
  3. The Diode Dynamics harness and the Shifts & Grins wiring kit comes with quick connectors that feed from the pigtail harness that plug into one another. I found this wiring too long, so I cut those pigtails off, shortened the cable, and then soldered the wires together. A little less “plug and plug”, but a tremendously more corrosion resistant solution. I then shrink wrapped and electrical taped the modified connectors. Be aware, as there are no instructions included, I assumed that blue wire went to blue wire between the S&G and DD kits. NOT TRUE! Blue to brown (if I recall the colours correctly) and then connect the other two.
  4. The lights and harnesses themselves can only plug in one way and consist of very high quality and weather-sealed connectors. Great stuff!
  5. To route the wiring to the battery, follow factory wiring harness paths along the passenger side keeping it tucked above the factory wiring where possible. Use zip ties judiciously to ensure the wiring cannot come loose. Following this path is simple and requires no disassembly of other stuff.
  6. To get into the engine bay, I went behind the passenger fender liner. From underneath the truck, you can just push the fender liner in to create enough space to feed the wiring harness up until you can grab it from the top of the engine bay.
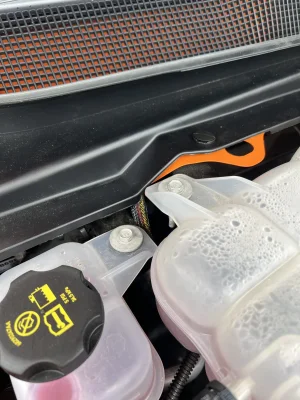
  7. From here, I used a screw driver to unclip the black plastic cover that hides the window wiper hardware at the base of the windshield. I slid the wiring underneath this black plastic cover. My thought was to protect the wiring harness from engine heat. It’s totally protected here!
  8. CC61DD2E-0AA2-4841-8CE4-FE52383B9546.webp
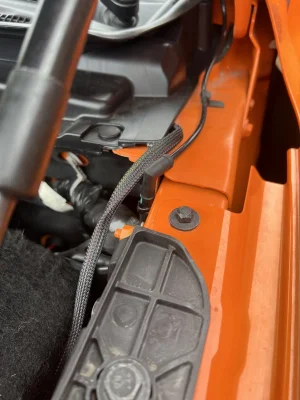
  9. Ran it over to the driver side underneath the black plastic cover and out the side right where the foam sits.4E4899B6-9AC2-404A-9104-4A702DF94DF8.jpeg
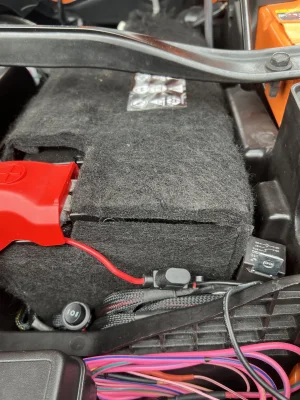
  10. I tucked the relay the the excess wiring right into the extra space inside the battery box. Not sure it as “finished” as I might like, but it is secure, easily reversible/accessible, and simple.
  11. A97204F1-35A9-402D-A85B-C78361AE987D.jpeg
Hope this helps someone!
 
@Shifts_And_Grins Do you have the installation of this kit documented? I thought I watched a video somewhere but can't remember. Links to any documentation would be appreciated.

Here is a link to a non plug and play kit with the Diode Dynamics harness. He did wire his slightly different. I have written instructions I can email to you that I just finished writing up (No pictures yet but the words are there). I am also going to work on getting the instructions up on the webpage and I will be doing my own videos soon of installations of all of our products.
 
I received my kit last week and installed it on Sunday. As everything is plug and play, there isn’t much to document.
  1. Crawl under the rear of the truck and remove the harness that plugs into the trailer receptacle on the backside of the rear bumper. I accessed this pretty easily from the passenger side.
  2. Plug in the included Diode Dynamics harness where you just removed the Ram harness and the plug the original Ram harness into the pigtail connector hanging right there. (Once you see the harnesses, my lame description will make sense.)
  3. The Diode Dynamics harness and the Shifts & Grins wiring kit comes with quick connectors that feed from the pigtail harness that plug into one another. I found this wiring too long, so I cut those pigtails off, shortened the cable, and then soldered the wires together. A little less “plug and plug”, but a tremendously more corrosion resistant solution. I then shrink wrapped and electrical taped the modified connectors. Be aware, as there are no instructions included, I assumed that blue wire went to blue wire between the S&G and DD kits. NOT TRUE! Blue to brown (if I recall the colours correctly) and then connect the other two.
  4. The lights and harnesses themselves can only plug in one way and consist of very high quality and weather-sealed connectors. Great stuff!
  5. To route the wiring to the battery, follow factory wiring harness paths along the passenger side keeping it tucked above the factory wiring where possible. Use zip ties judiciously to ensure the wiring cannot come loose. Following this path is simple and requires no disassembly of other stuff.
  6. To get into the engine bay, I went behind the passenger fender liner. From underneath the truck, you can just push the fender liner in to create enough space to feed the wiring harness up until you can grab it from the top of the engine bay.
  7. From here, I used a screw driver to unclip the black plastic cover that hides the window wiper hardware at the base of the windshield. I slid the wiring underneath this black plastic cover. My thought was to protect the wiring harness from engine heat. It’s totally protected here!
  8. View attachment 43572
  9. Ran it over to the driver side underneath the black plastic cover and out the side right where the foam sits.View attachment 43570
  10. I tucked the relay the the excess wiring right into the extra space inside the battery box. Not sure it as “finished” as I might like, but it is secure, easily reversible/accessible, and simple.
  11. View attachment 43571
Hope this helps someone!
That is also a way to do it. I finished instructions today. There are a million ways to wire this kit so I hope I covered what I assume will be the most popular ways based on conversations with customers. We also now offer a stand alone kit that is super easy to install but you lose the ability to manually control the light which a lot of people understandably want to be able to turn the lights on manually. I am always available to answer any questions you guys have as well.
 
That is also a way to do it. I finished instructions today. There are a million ways to wire this kit so I hope I covered what I assume will be the most popular ways based on conversations with customers. We also now offer a stand alone kit that is super easy to install but you lose the ability to manually control the light which a lot of people understandably want to be able to turn the lights on manually. I am always available to answer any questions you guys have as well.
I’m in on the pro kit. Do you offer a veterans discount?
 

TRX Forum Favs 👍

Back
Top