What did you do to your TRX today?

Its rare that its needed, but I still find it handy at night, especially when you get a bozo with crap LEDs and misaligned (or just plain not aligned) lights behind you.

I used to run a pair of KC Daylighters under my rear bumper, just for those occasions. 😆
 
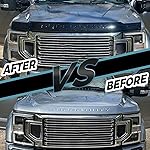
IdahoKTM. Those tints look pretty sharp. Would you mind providing a link or saying where you found? Googled and viewed a bunch on Amazon and Ebay. Some of those vendors are a roll of the dice ordering blind.
 
IdahoKTM. Those tints look pretty sharp. Would you mind providing a link or saying where you found? Googled and viewed a bunch on Amazon and Ebay. Some of those vendors are a roll of the dice ordering blind.


Smoke -Gloss, Dark Smoke.
 

Smoke -Gloss, Dark Smoke.
Thank you sir. Appreciate the info. Watched the video and looks like simple install. Really looks nice on Black TRX in that video, as well as yours.
 
Thank you sir. Appreciate the info. Watched the video and looks like simple install. Really looks nice on Black TRX in that video, as well as yours.

Yeah, super easy install. I would say a 2 out of 10 difficulty. I installed them wet. The reverse lens is a little tricky, but you can get it to form around the curves with a hairdryer.
 
I went with an integrated system for both Radar/Laser (Escort) and cameras (FitcamX), which I like a lot. Clearly not the cheapest option, but super clean and out of the way. Will also help when if I find myself in certain states and a police officer wants to know why he can't get a laser fix.
This is awesome, and exactly what I've been looking for. What is the escort system you got here?

Should have read the rest of the thread first, thank you!
 
Last edited:
Curious why did u remove it? Didnt like the look or install probs?
I didn’t really like the look. I had done this mod to my Limited prior owning my TRX and was very happy with it.

For some reason I think it looked great on the billet silver night edition but with the granite crystal it looks a bit off, a bit too dark and makes the red pop more than I would like.
 

Attachments

  • IMG_2624.webp
    IMG_2624.webp
    245.1 KB · Views: 117
I didn’t really like the look. I had done this mod to my Limited prior owning my TRX and was very happy with it.

For some reason I think it looked great on the billet silver night edition but with the granite crystal it looks a bit off, a bit too dark and makes the red pop more than I would like.
Looks good on silver for sure. Got a link for the kit by chance?
 
Looks good on silver for sure. Got a link for the kit by chance?
Sure thing!

I've bought a few items from them for other platforms in the past and they are solid.

 
Sure thing!

I've bought a few items from them for other platforms in the past and they are solid.

TBH im TERRIBLE with any vinyl installation. I tried to install a quality 5th window decal and ended up ripping it in half and jumping around my truck bed enraged lol. To that end, do you think i'd be able to install these overlays? The top and bottom look like sticker easy but the middle one looks funky.
 
TBH im TERRIBLE with any vinyl installation. I tried to install a quality 5th window decal and ended up ripping it in half and jumping around my truck bed enraged lol. To that end, do you think i'd be able to install these overlays? The top and bottom look like sticker easy but the middle one looks funky.
I installed them using the "wet" application. Basically, you use a kit they sell for $3 or something like that. I believe its a mixture of isopropyl alcohol and water that lets you move the film around and re-adjust it as many times as you want so long as you don't let it dry.

I did the install at night when it was a bit windy and it came out great if that helps.

They also include a vinyl test strip in the kit so you can try out your skills before the actual installation.
 
I installed them using the "wet" application. Basically, you use a kit they sell for $3 or something like that. I believe its a mixture of isopropyl alcohol and water that lets you move the film around and re-adjust it as many times as you want so long as you don't let it dry.

I did the install at night when it was a bit windy and it came out great if that helps.

They also include a vinyl test strip in the kit so you can try out your skills before the actual installation.
what do i search for to find the wet app kit? It looks like Luxe sells a few add-on to bundle including a $3.50 app kit. Is that the one?

Also, which decal style did you get? There's a bunch like FX carbon & 3d honeycomb. I have no idea what they are and the pics dont change when i select each
 
what do i search for to find the wet app kit? It looks like Luxe sells a few add-on to bundle including a $3.50 app kit. Is that the one?

Also, which decal style did you get? There's a bunch like FX carbon & 3d honeycomb. I have no idea what they are and the pics dont change when i select each

They include a squeegee with the kit. All you need is rubbing alcohol to clean the lens and a squirt bottle filled with water and a few drops of dish soap.

The tint looks great with Granite Crystal. This is Smoke-Gloss, Dark Smoke.

20211005_155306.jpg
 
They include a squeegee with the kit. All you need is rubbing alcohol to clean the lens and a squirt bottle filled with water and a few drops of dish soap.

The tint looks great with Granite Crystal. This is Smoke-Gloss, Dark Smoke.

View attachment 108694
Gonna have to give this shade a try. Looks awesome on granite.
 
They include a squeegee with the kit. All you need is rubbing alcohol to clean the lens and a squirt bottle filled with water and a few drops of dish soap.

The tint looks great with Granite Crystal. This is Smoke-Gloss, Dark Smoke.

View attachment 108694
looks great!
 
I installed my Mopar Power Running Boards. I like how they hide the skid plates.

20230830_140144.jpg


It took me about 3 hours doing it solo, but I could have finished up in a little over 2 hours. More on that below.

The instructions are pretty good, but thanks to @KnightMare I saved myself a bunch of time by leaving the wheelhouse liners in place and just flexing the liner enough to get the wires routed. I used an X-Acto knife to cut small slits in the firewall grommets and then fed the wires through using a fish tape. After you get the wires through, you have to insert the wires into the gray and black plugs. Some of the wire color codes made sense and some didn't. I finally figured it out and added the color definitions to the .PDF instructions.

Wire color codes.jpg


Once I got all of the wires routed and connected, it was time to mount the boards to the truck. I didn't have any help and I have a jacked up back, so I had to get creative. I removed the running boards from the individual boxes and set them on top of the box. I slid the box up to the side of the truck and rotated the boards so the flange cleared the bottom of the truck. Once the flange was under the truck, it was exactly the correct height to just slide the flange onto the bolts. Some of the bolts have just a light coat of paint on them and others are heavily coated. I cross threaded two nuts that had a lot of paint on them. It took me about 45 minutes to fix the buggered up threads with a tap and die set. I then cleaned the paint off of the remaining bolts with a die, before threading on the nuts. It takes an 8mm / 1.5 pitch die.

I opened and closed all four doors to make sure they deployed/retracted normally. Now I have to make changes in the BCM with AlfaOBD so I can extend/retract them with UConnect.

 
I installed my Mopar Power Running Boards. I like how they hide the skid plates.

View attachment 108727

It took me about 3 hours doing it solo, but I could have finished up in a little over 2 hours. More on that below.

The instructions are pretty good, but thanks to @KnightMare I saved myself a bunch of time by leaving the wheelhouse liners in place and just flexing the liner enough to get the wires routed. I used an X-Acto knife to cut small slits in the firewall grommets and then fed the wires through using a fish tape. After you get the wires through, you have to insert the wires into the gray and black plugs. Some of the wire color codes made sense and some didn't. I finally figured it out and added the color definitions to the .PDF instructions.

View attachment 108729

Once I got all of the wires routed and connected, it was time to mount the boards to the truck. I didn't have any help and I have a jacked up back, so I had to get creative. I removed the running boards from the individual boxes and set them on top of the box. I slid the box up to the side of the truck and rotated the boards so the flange cleared the bottom of the truck. Once the flange was under the truck, it was exactly the correct height to just slide the flange onto the bolts. Some of the bolts have just a light coat of paint on them and others are heavily coated. I cross threaded two nuts that had a lot of paint on them. It took me about 45 minutes to fix the buggered up threads with a tap and die set. I then cleaned the paint off of the remaining bolts with a die, before threading on the nuts. It takes an 8mm / 1.5 pitch die.

I opened and closed all four doors to make sure they deployed/retracted normally. Now I have to make changes in the BCM with AlfaOBD so I can extend/retract them with UConnect.
My boards came today and unfortunately were pretty badly damaged. I refused the delivery and am waiting on replacements. Looks like another week and a half of climbing in and out 😂😂.
I ordered PN 82215287AH through BAM. Does that include everything needed (wiring, etc) to install?
 

TRX Forum Favs 👍

Back
Top